

BCR2000 Set Up
By David Clarke [21030085++]The BCR2000 is a general controller. It offers quite a lot of flexibility of programming - in terms of what the elements on the control surface manipulate, and how the encoder rings display data, and the resolution of the knobs. This flexibility allows the unit to be adapted for many uses - but this same flexibility makes it confusing for a user that just wants to “get going.”

The following discussion is not intended to be a reiteration of the data in the Behringer manuals - instead it is intended to be a simplified discussion of what a user might do in order to quickly get up and running with the BCR2000 and a CC+ equipped Rhodes Chroma or Expander.
Why the CC+?
The BCR2000 is a generic controller. It does not strictly require a CC+ interface on a Rhodes Chroma/Expander. It could also be used with any MIDI interface that (for instance) offers MIDI Continuous Controller manipulation of parameters - such as the Syntech/KMX MIDI interface.
The reason why the CC+ is discussed here is because of one of the benefits it offers over other interfaces. It makes ALL of the Chroma’s parameters available over the MIDI interface - not just a limited subset.
So it would be possible to create a BCR2000 map that only handles a subset of MIDI CC controls – but most users who want to have a high level of “knob control” would want to be able to access as many settings as possible. The general steps outlined in this discussion would be appropriate for that sort of mapping too - but the actual parameter mapping would be different.
For the sake of this discussion (and the resulting example .syx files to program the BCR2000), it is assumed that a CC+ is installed in the associated Chroma/Expander.
Basic Behringer Communication Setups
The BCR2000 comes with a USB, MIDI IN, MIDI OUT A and MIDI OUT B/THRU ports.
The “Operating Modes” section of the BCR2000 manual discusses all the different methods of configuring the data communications to the unit, and how data flows to/from the unit on those ports.
The USB interface can make the BCR2000 appear to a computer as another MIDI interface with its own IN/OUT/THRU.
Different modes will work for different specific setups you may have in your studio, but for the sake of this example, “Standalone Mode 3” is chosen.
In Standalone Mode 3, USB communications are not used. The MIDI IN data is merged with the knob/controller data, and is available on MIDI OUT A. MIDI OUT B does not have the input merged, and instead only carries the knob/controller data. This is a configuration that may make most sense for those situations where you want to be using the BCR2000 to make new patches - and then allowing the output of the Chroma/knobs to be recorded by an external sequencer.
The communication mode of the BCR2000 is set as a global setting in the unit. To adjust this setting, power up the BCR2000.
Hold the EDIT key, and press the STORE key.
The display will change to show “EG” - indicating that you are in the “Edit Global” setup mode. The EDIT and STORE keys can now be released (their LEDs will remain illuminated.)
Turn the knob in the top left corner of the BCR2000 until the display shows “S-3.”
Once the setting is made, you can exit the global setup mode by pressing the “EXIT” key. The display of the BCR should return to normal.
Programming the BCR2000
Before the BCR2000 can be easily used to control the Chroma, it has to be told what knobs/buttons should be used - and how they should react. The BCR2000 allows for 32 different Presets to be stored.
The presets can be created by having the BCR2000 “learn” settings. This is done through a combination of button presses/knob turns on the unit itself, and is outlined in the BCR2000 documentation.
More easily, one of the two commonly available editors can be used to create presets for the BCR.
Behringer offers an application called “B-CONTROL EDIT” (download BC-Edit_02beta3.zip, 2.9mb—see B-Control Downloads for any future updates). This is available for download from the BCR2000 product page on the Behringer web site. It is a Java application and appears appears to be a beta release. It appears functional, but is not particularly user friendly nor powerful. It is free though.
There is also a freeware (donations accepted) application called “BC Manager” from Mountain Utilities. That program is much more flexible and capable than the Behringer BC Edit.
The programs noted above outline how presets can be edited/created, but these programs are not specifically required in order to use the BCR2000 with the Chroma - you can instead just download a .syx file into the BCR and have a preexisting program uploaded.
If you’re just sending a .syx file to the BCR2000, then a connection similar to the following can be used:

If the desire is to use the bidirectional communications offered by the editing programs, then a connection similar to the following can be used:

The .syx file below is set up to save the Chroma A parameters into Preset Location 1 and Chroma B parameters into Preset Location 2. It is strongly recommended that if there are any contents of the BCR2000 that you wish to keep, that you back them up before downloading the Rhodes Chroma CC+ .syx file to the BCR2000.
Once you have backed up whatever material you might like, send the .syx file to the BCR2000.
When downloading you’ll see the MIDI IN/OUT LEDs on the BCR2000 flash. You should also see the main display show a counter-clockwise rotating pattern. As the patches are downloaded, you’ll see the LEDs on the encoders light up (in sequence). When complete, the system will display a program number (such as P-2).
Once the BCR2000 is set up/programmed, it does not have to be programmed again unless you find you want to adjust what parameters go where or how they react.
What was programmed into the BCR2000
Once the .SYX file is sent to the BCR2000, the following settings are in place for both A parameters (Preset 1) and B parameters (Preset 2):
The encoder rings are programmed such that unused locations will have their LEDs always off - and the active locations will never have all their LEDs off. If a knob has an LED on, then that knob is active.
Chroma CC+ Settings
There are no CC+ settings truly specific to the BCR2000. Instead, it is just the case that the BCR2000 example used here wants to use all of the CC+ parameters, and it wants to use them according to the default “Custom” MIDI CC map available in the CC+.
The recommended CC+ configuration steps are:
- accept MIDI parameter changes
- use the Custom MIDI Controller Map
- ensure that the MIDI Controller Map is initialized
To make these changes, enter CC+ programming mode by issuing [Set Split][36] on the Chroma/Expander. Editing mode will be signified by the large LED display on the Chroma showing “EP”.
To enable Program Changes, select [P6] and ensure it is set to “On.” To use the Custom MIDI Controller Map, select [P18] and ensure it is set to “CUSt”
While the MIDI Controller Map is normally initialized already, to ensure that it is (and that the mapping is as expected), select [P20], and move the “Parameter Control” slider to reinitialize the settings.
At this point the CC+ will listen to MIDI CC messages, and will be able to have all of its parameters controlled.
The CC+ offers two ways of having MIDI CC messages actioned. One of these modes sends the control data to the voice cards only. It does not actually change the parameter in the program of the Chroma. This mode allows you to easily dynamically change the setting of a parameter - but that change will disappear when the Chroma is restarted or when the patch is reselected.
The other mode instructs the CC+ to apply any requested changes to the current program. In that way, MIDI CC changes are persistent, and so if you use the BCR2000 to get to a sound that you like - that sound will actually be represented by a stored patch, can be saved, and will persist across a power cycle.
Your choice of how continuous controllers are handled is selected via CC+ configuration Parameter 24 (“Select MIDI Continuous Controller Mode.”) Choosing a setting of “InSt” will result in changes being made only to the instruments - a setting of “Prog” will result in changes to Program 0. Most BCR users seem to want to use the “Prog” mode, so that changes are persistent. This will be set via:
- Select [P24] - Select “Prog”
Communicating Between the BCR2000 and the Chroma
Starting with CC+ firmware release 215, the Chroma will respond to a Data Request SYSEX message. This support allows a unit like the BCR2000 to request a snapshot of the current parameters from the Chroma. It can then use those to update its parameter display.
To take advantage of this bi-directional communication between the Chroma and the BCR2000 it is recommended to connect the MIDI OUT of the Chroma to the MIDI IN of the BCR2000. Similarly, MIDI OUT of the BCR2000 would go back to MIDI IN of the Chroma.
The BCR2000 also supports a MIDI OUT that has a merged copy of the MIDI IN (e.g., the data from the Chroma) and the knob data. This would be the sort of data which would make sense to go to a sequencer.
If you were just looking to edit back and forth with the BCR2000 and the Chroma, you might use a configuration as below:

If you wished to also have bidirectional communications with a computer, and have the knob data available on both the computer and the Chroma, you might use a configuration similar to that below:

Summarized Steps
Configuring and Programming the BCR2000
- On the BCR2000, hold the EDIT key, and press the STORE key.
- When the display changes, release EDIT and STORE.
- Turn the top left knob on the BCR2000 until the display shows “S-3" Press the EXIT key.
- Connect the BCR2000's MIDI IN to the computer’s MIDI OUT
- From the Computer, send .syx file to the BCR2000.
Connecting the BCR2000 to the Chroma
- Connect the BCR2000's MIDI IN to the Chroma’s MIDI OUT
- Connect the BCR2000's MIDI OUT B to the Chroma's MIDI IN
Configuring the Chroma
On the Chroma/Expander perform the following:
- [Set Split 36]
- Select [P6] - Ensure set to “On”
- Select [P18] - Select “CUSt”
- Select [P20] - Move “Parameter Control” slider
- Select [P24] - Select “Prog”
- [Set Split 36]
Troubleshooting
- When you change to a different patch on the Chroma, the BCR2000 will not automatically update its settings. To have the BCR2000 show the current settings do one of the following:
- switch between Preset 1 and 2 (this will cause a Data Request message to be sent, which will result in the parameters shown being reflective of the real settings in the Chroma)
- Instruct the BCR to immediately send its “data request” command, by holding the “EDIT” button and then tapping the “LEARN” button.
- If you can’t see the Chroma’s parameter values on the BCR2000:
- Check that wiring is correct
- Check that the CC+ is running firmware 215 or higher.
- When you make a parameter change on the BCR2000, you should see:
- the MIDI Out LED on the BCR2000 illuminate
- the MIDI in LED on the MIDI CC+ cable (and the Chroma’s display) illuminate
Notes
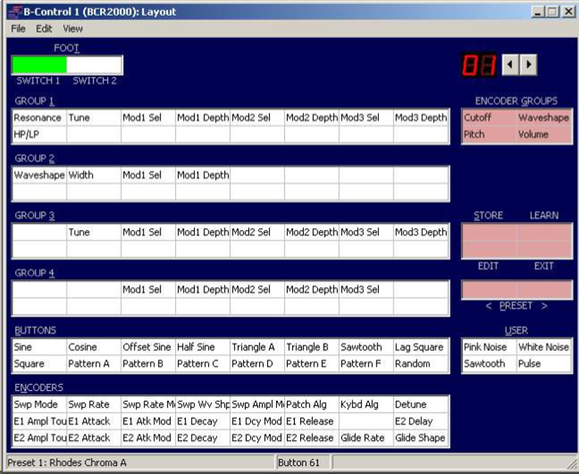
- The provided SYSEX file contains parameter names that can be interpreted by the BC Manager software. That software can also be used to print out labels to place on the BCR2000, to identify the purpose of the Knobs/Buttons.
- There are other inputs available on the BCR2000 not used in this example, and other features not used. For instance, the BCR2000 could be programmed to use one of the buttons as a “note on” - to make it convenient to trigger a sound - perhaps because you’re wanting to make patches for the Expander and want a key trigger.
- There are many different ways to configure both the MIDI connections and the knob/button assignments. The data provided here is only intended to be one possible configuration - which might be used as a starting point. There is nothing “wrong” with wanting to change the settings here or deciding to set up in a different way.
- If you use the Alphanumeric display with the Chroma, and if the Chroma’s current parameter is the one being edited via the BCR2000, then the LCD display will similarly decode the values seen from the BCR2000.
The BC Manager software will allow a text file with BCR2000 command language statements to be used. These text files can make editing faster (when compared to using the graphics user interface of the program) by allowing direct access to parameters, text strings and the like. They can also make it much easiser to move parameters from one knob to another. For convenience the text file associated with the settings above are provided in text file format here This file can be directly imported into the BC Manager software.